Eating Jewish: Bialys
I have an affinity for baked goods, both savory and sweet, that runs deep. Since Jewish cuisine is absolutely teeming with baked goods, it provides me with many ways to indulge this passion and I’m determined to try as many as I can (for the sake of my culinary education, of course…). I was recently reminded that the bialy still remained on my “to try” list when I came across this article a few weeks ago, in which readers are told how Brooklyn’s oldest bialy shop was saved from closure by two Muslim businessmen who bought the business. With the intent of preserving the history of the shop, the new owners chose to use the same bialy recipe as the previous owners.
Not as popular or well known as the bagel, bialys are still a significant part of the culinary traditions of the Ashkenazi community. However, bialys are simply not sold in Montreal; I’ve read that this is because there were no immigrants from Bialystok (the home of this bread) that settled in the city. So, I was going to have to make my own. Also, since the consensus seems to be that bialys are best eaten fresh out of the oven, this was clearly the way to go.
Bialys originated in the city of Bialystok, Poland, in a Jewish community that numbered more than fifty thousand before World War II. The locals knew them as kuchen, while outsiders generally referred to them as Bialystoker kuchen or the name used today, bialys. They were so popular in this city that they were sold on almost every street in Jewish areas and they were present at most meals, sometimes even becoming a meal in themselves. When members of the Bialystok Jewish community immigrated to the United States, they brought the bialy with them and began to open bakeries devoted to these savory rolls. With the majority of this community settling in New York, these bakeries were a popular sight in the city, especially on the streets of the Lower East Side.
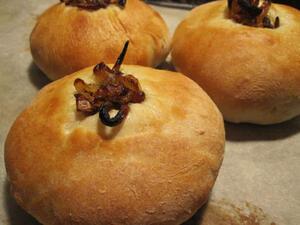
Admittedly, there are quite a few steps in this recipe and it takes a while to make but don’t let that scare you! This is not a constant hands-on recipe, but rather the majority of the time is devoted to letting the dough rise, something that is done five times for varying amounts of time. Traditionally, raw grated onions are placed in the indentation of the bialy prior to baking, allowing them to cook slightly while in the oven. I wanted a deeper onion flavor so I decided to caramelize the onions until they were soft and sweet prior to placing them on the bialys. Although I haven’t tasted a traditional bialy, I highly recommend this variation. Finally, you may notice in the picture that my bialys puffed up quite a bit during baking, making it so that the indentation is not as defined, as it should be. To avoid this, it’s important to flatten each ball in Step 7 of the recipe, but if this happens to you, just know that they will still taste really great.
Whether you’re a bialy connoisseur or a neophyte like myself, I think homemade bialys are a definite must. The results are soft yeasty, oniony rolls that are delicious topped with a smear of butter or cream cheese soon after they’ve come out of the oven.
Bialys
Adapted slightly from Gil Marks’ Encyclopedia of Jewish Food
Dough
1 package active dry yeast (these packages are generally 8 grams which is equivalent to 2 ¼ teaspoons)
1 ¼ cups warm water
2 tablespoons sugar
2 teaspoons table salt/sea salt or 4 teaspoons kosher salt
About 3 cups bread flour and more for dusting your work surface
Topping
2 medium onions, halved and thinly sliced
3-4 tablespoons of olive oil
-
Dissolve the yeast in ¼ cup warm water, stir in 1 teaspoon of sugar and let the mixture stand until it is foamy, about 5 to 10 minutes.
-
In a large bowl, combine the yeast mixture, the remaining sugar and water, along with 2 cups of flour. Stir to combine and then begin to add the remaining flour until you get a dough that holds together.
-
On a lightly floured surface, knead the dough for 10 minutes, until it is smooth and elastic. This is a sticky dough, and you’ll have to keep adding flour to your work surface and to your hands while you’re kneading. Place the dough in an oiled bowl and turn to coat the surface. Cover with a kitchen towel and let rise in a warm place until it has doubled in bulk, about 1 ½ to 2 hours.
- While the dough is rising, make the topping. Heat olive oil over medium low heat and slowly cook the onions until they caramelize and turn golden brown. Set aside.
-
Punch down the dough and knead it for 30-40 seconds. Return it to the bowl, cover, and let it rise in a warm place until it has once more doubled in bulk, about 1 ½ hours.
-
Punch down the dough and knead for 30 seconds. Divide the dough into 8 equal pieces and roll into balls. Because this dough is quite springy, it can be hard to roll the pieces into balls. I found it made it easier if you fold the ends of the pieces inwards, then beginning to roll with a good amount of pressure, tucking pieces underneath when necessary. Place them on your work surface, cover and let them rest for 10 minutes.
-
Using the palms of your hands, flatten each ball into a 3 ½ inch round that’s about ½ inch thick. Place on baking sheets lined with parchment paper, cover, and let rise in a warm place until they have increased in size by about half, about 30 minutes.
-
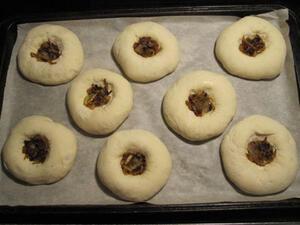
Using your index and middle fingers, press down in the middle of the dough rounds to create an indentation. Make sure to leave a rim of at least 1 inch around the indentation. Fill the indentations with the caramelized onions. Cover and let the dough rise for 15 minutes.
-
Preheat the oven to 425 degrees.
-
Bake the bialys until golden brown, 10 minutes.


From The Bialy Eaters, The Story of a Bread and a Lost World. Mimi Sheraton 2000. A good book to have.
Izaak Rybal, now deceased, on Bialy made in NY. "Bialystoker kuchen were bigger, crisper in the middle, and had lots of (mohn) poppy seeds, and brown onions."
Book Introduction from Samuel Pisar NY.
"When I was an adolescent in Auschwitz lying on the hard shelf that was my bed and hallucinating from hunger, I would often try to recall the shape and savory aroma of the kuchen we used to eat at home in Bialystok. By then I had lost all of my family and school friends.
Years later, when I was in New York, I would often watch those street-corner wagons that sell coffee and bread in the morning. I marveled at the whites, blacks, Asians, and latinos as they munched on their bialys. I felt as though I was from another planet.
To each of them, it was simply a tasty snack. How could they know they were partaking of something sacred, a bread that evoked bittersweet memories of a culture and tragic corner of eastern Poland? A bread that, in my psyche, summons up even today the mystical dream world of Marc Chagall and Isaac Bashevis Singer.
Letter from Pesach Szmusz to Mimi Sheraton.
In June 1941 the Nazis came to us, and since then, there are no bakeries and no more of our Bialystok Jews.
The Nazis killed almost all of us. I was in Auschwitz and other concentration camps with Samuel Pisar, and I was liberated in Dachau, then spent four months in a tuberculosis hospital. I went back to Bialystok and left shortly with a curse on my lips and a promise never to return to that cursed land and people again.
Poland was the only country where young Jews were killed after the war. I don't forgive the Nazis, but I don't forgive the Poles either. When the Nazis came to Bialystok on June 27th 1941, Poles showed them where the Jews lived and Poles robbed the Jewish houses. The Nazis did not build Auschwitz, Treblinka or Maidanek in France, Belgium or Holland. They built them in Poland because they knew the Poles would help them kill the Jews. The Poles were partners in our destruction.
Please forgive me for expressing my thoughts. I was 20 years old in the Bialystok ghetto, 23 years old in Auschwitz, and 100 years older after the liberation. I am still not liberated and I will not be free until my last day.
And this is the story of the bialystoker kuchen. I do not think any Bialystoker can tell you more.
Bialy recipe from Mimi Sheraton, devised with the help of the bakers at Kossar's bakery NY, with bakery stating the recipe would not get the results that exactly matched thiers, as they bake in a brick lined convection oven with revolving iron shelves, & Kossar bakery recipe uses 100 pounds of flour, 7 gallons of water, 2 pounds of salt, and 1 pound of yeast for a yield of 70 to 80 dozen bialys.
Recipe for Bialys.
To make 12 to 14 bialys, each 3 1/2 to 4 inches in diameter, you will need about 1 1/2 to 2 pounds or about 5 to 6 cups of high - gluten bread flour, about 3 cups very cold water, tap or bottled, 2 tablespoons non-iodized kosher coarse salt, or coarse sea salt, and 1/2 ounce of fresh bakers yeast.
For the topping, 1 medium size sweet white onion (a scant cupful when finely chopped) and about 2 tablespoons of coarse, toasted bread crumbs. (Kossars bakery NY, uses crumbs made of dried, ground bialys.)
The onion topping is best prepared 3 to 5 hours before it will be used, so that it will soften slightly, and the harshest aroma and flavor of the onions will evaporate.
Peel and chop onion fine. For best results, do this with a chopping knife or, as a second choice, throught the fine blade of a meat grinder. Do not use a food processor or blender, as the onion will become too liquid.
Thoughly mix 1 tablespoon of crumbs into the chopped onions and set the mixture aside, loosely covered; reserve the extra crumbs. After about 3 hours, check to see if the mixture has thickened to the texture of loose wet sand. If it is too liquid, add more crumbs a half teaspoonful at a time, waiting 10 minutes between each addition.
To prepare the dough, mash yeast into 1/2 cup cold water. When dissolved, stir in the remaining cold water. Turn 5 cups of flour and the salt into the bowl of an electric mixer and, using the dough hook, beat in the yeast water. Slowly beat flour and water, adding more flour gradually only if the mixture is too sticky, or a little more water if it is too stiff, but err on the side of stickiness.
Raise the mixer speed to medium, and beat only until the mixture holds together but is still sticky.
Gather the dough and place in a clean, large, unoiled glass or ceramic bowl. Cover the bowl loosely with a towel and set it in a warm, draft free corner. let it rise for three and a half hours, or until double in volume, or until an indentation made with a finger springs back into place. (Time will vary with the warmth in the room. If it is a very cold day, place the loosely covered bowl in an oven that is turned off but that has a pilot light.)
At this point, you can try to knead the dough with the dough hook of the mixer for about 10 minutes. However, because the dough is thick and sticky, some older models of home mixers should be run only at the first or second speeds to avoid burning out the motor. After 10 minutes, or instead of using the dough hook, turn the risen dough out on a lightly floured board. Knead by hand for 5 to 10 minutes, if you have used the dough hook, or 15 to 20 minutes, if you have not.
A dough scraper is essential for this. The dough should be smooth, elastic and blistered. Work in additional flour only if needed.
Shape it into a ball and place back in the mixing bowl and cover loosely with a towel. Let it rise in a warm, draft free corner for about 1 1/2 hours, or until a depression made with a finger springs back into place.
Punch down the risen dough. divide into four portions and roll each of these between the palms of your hands into ropes that are about 2 inches in diameter. From each rope, cut or pinch off three or four pieces. Roll each gently but firmly into a ball between lightly floured hands. Cover the shaped rolls to prevent them from drying out as you work the remainder. When all rolls are formed, cover them with a kitchen towel and let them rest for 45 minutes.
Slide baking stone or baking sheets onto shelves in the lower third of the oven and preheat to 450 degrees.
To form the center indentations on the rolls, work with well floured hands and lift each round of dough slightly off the work surface and slip the index and middle fingers of both hands underneath, with both thumbs working on top. Press and lightly stretch the center bottom dough, forming a well (but not a hole) and leaving about a 1 1/2 inch rim of unpressed dough. Or, using a small glass or jar with a completely flat bottom, that is 1 1/2 to 2 inches in diameter, press down very firmly in the center of each flattened round and twist to spread dough, then spread lightly with your fingers.
Using the sides of your hands, reshape the rims of each bialy. Keep the bialys covered until all are shaped.
When all bialys are formed, add the onion topping. If you are going to use poppy seeds, brush the top of the bialys with water so that the seeds will stick; this is not necessary if you are using onions only.
Dip your slightly cupped index, middle, and fourth fingers into the onion crumb mixture and smear about a scant teaspoonful over each bialy, being sure to get a thin coating in the well and around its top edge and spreading the well again. Then sprinkle about 1/2 teaspoonful of poppy seeds over each bialy.
Using a flat, wide spatula as a peel, place the bialys on the preheated baking surface, leaving about a 1 inch space between each on all sides.
Bake 15 to 20 minutes, or until the bialys are as golden brown as you want them to be. Remove from the baking surface. Eat them (or sell) then as soon as you can. If you plan to freeze any bialys, let them cool on a rack for 10 minutes before wrapping.
Note: If you use baking sheets or a pizza tile, you will be able to change the position of the bialys easily during baking. Start them in the lower third of the oven and, after 10 minutes, slide the sheets onto a shelf in the upper third of the oven. That way the onions are less likely to burn and bottoms become crisp.